The CB&Q in Wyoming is gone.
Shortly after my last post in late October, 2014, my wife was diagnosed with stage IV breast cancer.
We relocated closer to my employer in Charleston, SC. The layout was disassembled in early 2015 and we got rid of the house.
My wife died in late 2015.
I'm still trying to figure out what I'll do in the future. I may build another layout someday, but not in the next year or two.
About Me

- Mark B.
- Casper, WY
- I grew up in Wyoming, mostly living in areas served by the railroads I model. I remember standing at the window in our Cody Wyoming home, staring at night at the old Husky refinery across town. I remember the bridge across the creek and under the tracks between Powell and Cody. I remember always looking for trains as we travelled through the Wind River Canyon. And I remember my mother's last home - a mobile home in Evansville next to the Burlington mainline.
Friday, May 06, 2016

Sunday, October 26, 2014
Another Month Gone By
It's now late October 2014. Progress continues on the layout. This past month I've cut a pass-thru from the main room into left-hand small room, and laid track almost up to the pass-thru. I also started construction of the first table in the next room.
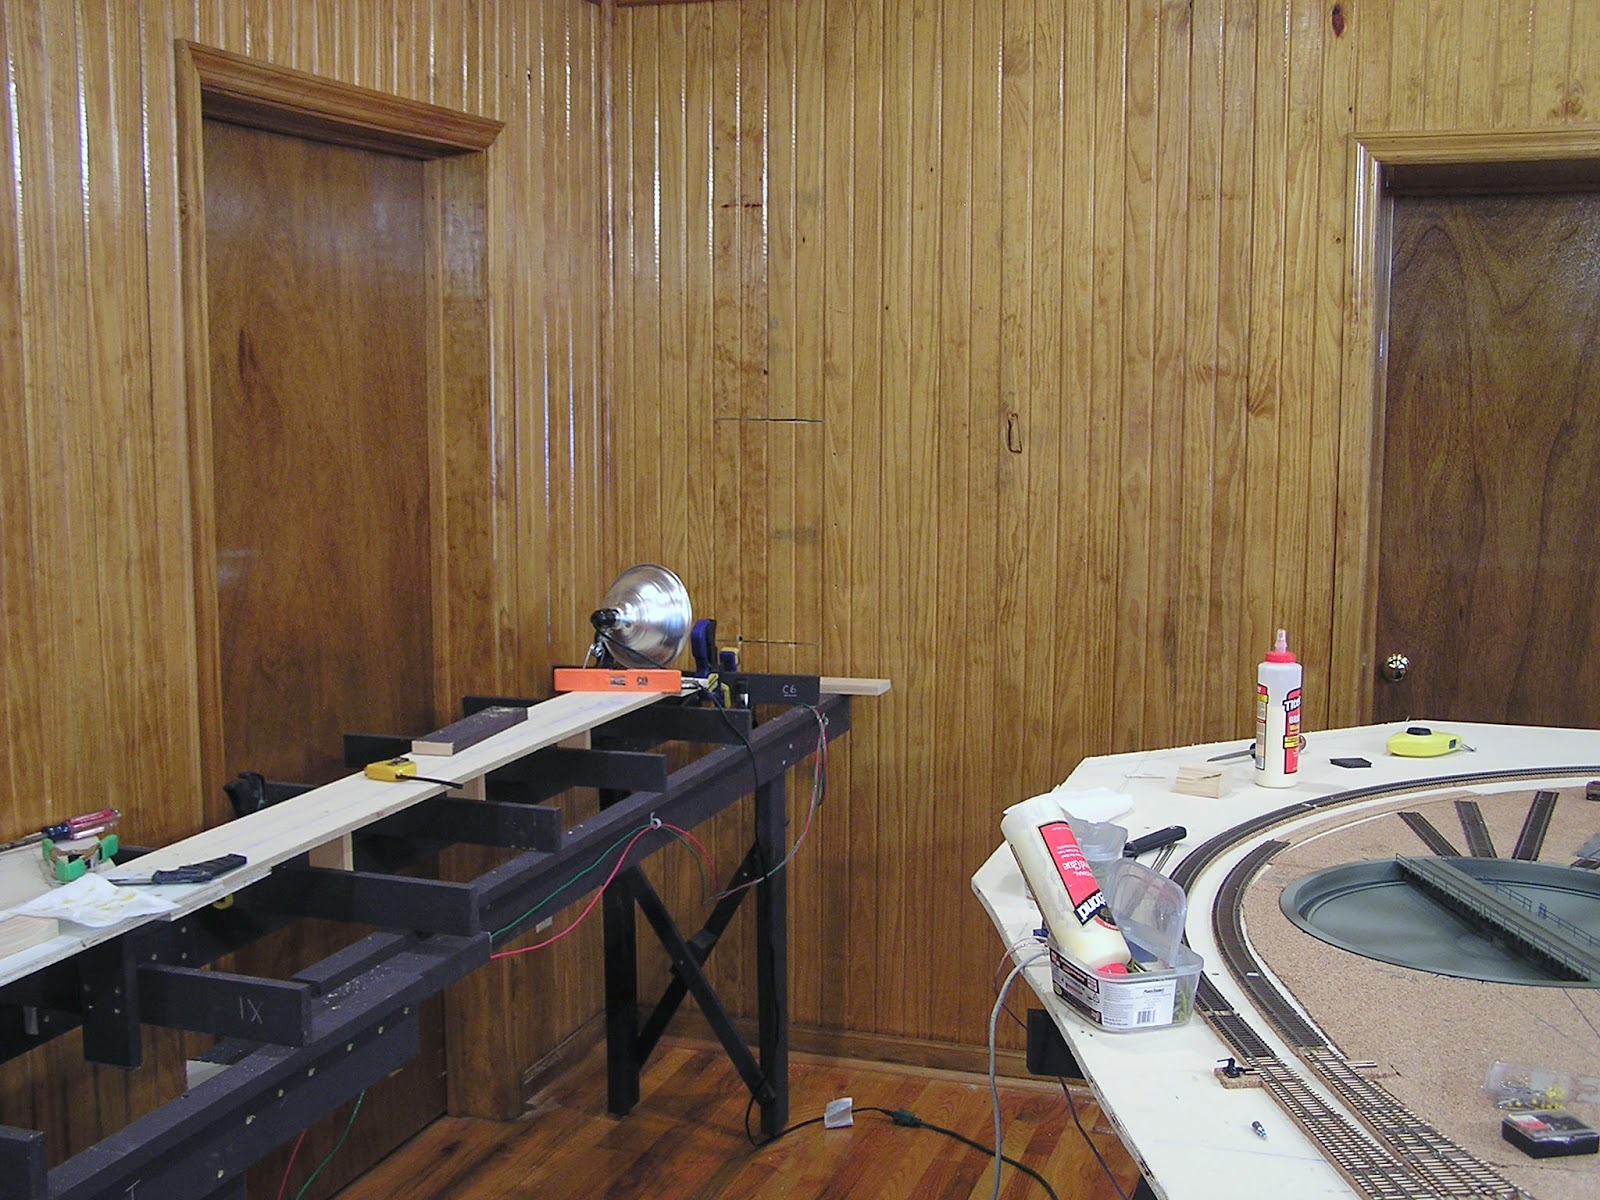
If you look close in this picture, you can see where the opening has been cut just to the right of the reflector on the light. I put the boards back up temporarily.
Here's the pass-thru under construction. It's about 18 inches between walls, so I lined the opening with 1X4 & 1X6 pine. I was working only from this side, leaving the drywall on the other side intact until I finished boxing out the tunnel. That way I didn't cut out the wrong location on the other side. It sure made building the lining a pain at times, though!

And here's the pass-thru completed. I managed to finish without having to take out any wall studs, which in this house are 2X6's. I did remove a couple pieces of blocking between studs - one on the near side, and one on the far side.

And speaking of the far side, here's the pass-thru from the other room. I removed the drywall in one chunk, so if I ever need to seal the pass-thru I can simply frame the opening and install the removed pieces from both sides.

We hosted the NMRA division annual business meeting here yesterday, so I had to clean up the layout and prepare for the visit. Folks were very gracious, and seemed to like what I've accomplished so far (small amount that it is).
If you look close in this picture, you can see where the opening has been cut just to the right of the reflector on the light. I put the boards back up temporarily.
Here's the pass-thru under construction. It's about 18 inches between walls, so I lined the opening with 1X4 & 1X6 pine. I was working only from this side, leaving the drywall on the other side intact until I finished boxing out the tunnel. That way I didn't cut out the wrong location on the other side. It sure made building the lining a pain at times, though!
And here's the pass-thru completed. I managed to finish without having to take out any wall studs, which in this house are 2X6's. I did remove a couple pieces of blocking between studs - one on the near side, and one on the far side.
And speaking of the far side, here's the pass-thru from the other room. I removed the drywall in one chunk, so if I ever need to seal the pass-thru I can simply frame the opening and install the removed pieces from both sides.
We hosted the NMRA division annual business meeting here yesterday, so I had to clean up the layout and prepare for the visit. Folks were very gracious, and seemed to like what I've accomplished so far (small amount that it is).
Wednesday, September 24, 2014
A Lift-out and Other Progress
It's been about four months, so I guess it's time for another update.
I spent some time on the Laurel roundhouse, and as of about early July, it looked like this:

It still looks like that as of today (24 September).
I had a work session in mid July. We added a couple more sections of benchwork along the wall (where Casper will be) and continued the subroadbed installation from the point we left off last time, at the temporary bridge. A couple of the guys added buss wires and installed some track feeders. Thanks, guys!
After that work session, I decided to get the lift-out built to replace the temporary immovable bridge I showed in the last update. I got tired of walking all the way around the Laurel peninsula pretty quickly!
I documented that whole construction story in this thread at RR Line Forums. Here are a couple of shots of the lift-out in place and removed:


That sure makes it easier to get around the layout! The lift-out is in and wired, though the wiring is temporary until I get the wall and door that will be on this side of the above photos completed. Then the wires will be permanently run around the top of the doorway, rather than through a cable "bridge" on the floor where they are now.
I focused pretty exclusively on the lift-out until early September. Then on September 11 I had another work session. Four guys showed up, and once again we accomplished quite a bit - completion of bench sections along the Casper wall (benchwork construction will never be done!), installation of more subroadbed, and more track wiring. This time the wiring added feeders to the opposite end of Laurel yard (near the lift-out). Before that, all the yard tracks got current only from the end near the Laurel engine facility.
Here's a really exciting shot of those newly-installed feeders:

Here's the now-complete benchwork for Casper, along with some NP mainline hidden subroadbed installed (Casper will be about five inches above this), leading right up to where I need to cut a hole in the wall to get to the next room:

And to cap off this installment, here's an overview of the layout as of today:

Now to get started cutting that hole!
I spent some time on the Laurel roundhouse, and as of about early July, it looked like this:
It still looks like that as of today (24 September).
I had a work session in mid July. We added a couple more sections of benchwork along the wall (where Casper will be) and continued the subroadbed installation from the point we left off last time, at the temporary bridge. A couple of the guys added buss wires and installed some track feeders. Thanks, guys!
After that work session, I decided to get the lift-out built to replace the temporary immovable bridge I showed in the last update. I got tired of walking all the way around the Laurel peninsula pretty quickly!
I documented that whole construction story in this thread at RR Line Forums. Here are a couple of shots of the lift-out in place and removed:
That sure makes it easier to get around the layout! The lift-out is in and wired, though the wiring is temporary until I get the wall and door that will be on this side of the above photos completed. Then the wires will be permanently run around the top of the doorway, rather than through a cable "bridge" on the floor where they are now.
I focused pretty exclusively on the lift-out until early September. Then on September 11 I had another work session. Four guys showed up, and once again we accomplished quite a bit - completion of bench sections along the Casper wall (benchwork construction will never be done!), installation of more subroadbed, and more track wiring. This time the wiring added feeders to the opposite end of Laurel yard (near the lift-out). Before that, all the yard tracks got current only from the end near the Laurel engine facility.
Here's a really exciting shot of those newly-installed feeders:
Here's the now-complete benchwork for Casper, along with some NP mainline hidden subroadbed installed (Casper will be about five inches above this), leading right up to where I need to cut a hole in the wall to get to the next room:
And to cap off this installment, here's an overview of the layout as of today:
Now to get started cutting that hole!
Sunday, May 25, 2014
Laurel Engine Terminal Is Taking Shape!
Since my last post about 4 1/2 months ago, I've focused entirely on Laurel, and in particular on the engine terminal.
The turntable is in and functioning properly. Radial tracks are all installed and most are wired, but only one lead out of the three planned is installed yet. Here's what it looked like while I was wiring up installed tracks:

Here's the overall view of Laurel as of Friday, 16 May. A work session was in the works for the next day, so I cleaned all the crap off the benchwork that seems to collect there. You can see the one turntable lead (the track with the passenger car on it) that's in place. The other two will be to the right of it in this photo, and there will be one more track - the one which brings coal and sand to the terminal, to the left of that track.


The plan immediately ahead is to get the roundhouse construction started, and lay track on the new subroadbed.
The turntable is in and functioning properly. Radial tracks are all installed and most are wired, but only one lead out of the three planned is installed yet. Here's what it looked like while I was wiring up installed tracks:
Here's the overall view of Laurel as of Friday, 16 May. A work session was in the works for the next day, so I cleaned all the crap off the benchwork that seems to collect there. You can see the one turntable lead (the track with the passenger car on it) that's in place. The other two will be to the right of it in this photo, and there will be one more track - the one which brings coal and sand to the terminal, to the left of that track.
I had the work session as planned on Saturday the 17th - thanks Phil, Jim, Charles and Jimmy! Jim and Phil installed some 120 volt wiring and outlets around the edges of the layout, then wired in more radial tracks for the turntable. Charles and Jimmy worked on the bridge and subroadbed that connects the Laurel peninsula to the benchwork Casper will be on. That bridge, which is temporary and will be replaced by a drop leaf at some point in the future, can be seen below. If you look carefully, you can also see the 120V wiring Jim and Phil put in, running along the face of the L-girders. That's a huge help, because I've been moving an extension cord back and forth between areas I've worked on since this project got started. Having outlets within easy reach is a major convenience!
The plan immediately ahead is to get the roundhouse construction started, and lay track on the new subroadbed.
Saturday, January 11, 2014
"Near End" Laurel Yard Throat Installed
The switches and yard tracks for the Laurel yard throat near the locomotive facilities has been installed and wired.

I still need to install ground throws on the new turnouts, add the caboose track and complete the engine facility tracks (that's a long term project that will be done as the facilities are constructed). But the body tracks are functional at this point.
I still need to install ground throws on the new turnouts, add the caboose track and complete the engine facility tracks (that's a long term project that will be done as the facilities are constructed). But the body tracks are functional at this point.
Wednesday, January 01, 2014
The Last Eight Or So Months
Okay, here's an update. This will cover everything from the June 13 2013 update until today, plus a bit since late April (because the June update was so general).
In early May I was laying out the end of the Laurel yard throat at the turnback curve:
 I printed out a couple of #8 turnout templates and used them to arrange the entry into the siding and yard throat.
 After I was sure I knew what the arrangement of the throat would look like, over the next several months I built three left- and one right-hand #8's, plus three left- and two right-hand #6's.
June 15th I had another work session.
 In attendance this time were (left to right) Jim, Jimmy and Phil. They were all present at the first work session as well, so I guess the long drive the first time didn't put them off returning (thank goodness)!
 In this photo, Phil and Jimmy are installing another section of benchwork. This will be the far end of Laurel yard. Jim is gathering up components for setting up a shelf for my NCE DCC system. Below you can see him hard at work putting it together.

After the work session I just kept slogging along building the turnouts and installing the yard from the one end to the other. I should probably have taken a few pictures as I went, but I didn't take any more of the layout until the end of 2013.
I took a week off from everything - the layout, work, and just life in general, to attend the NMRA national in Atlanta in July, along with my wife. I gave my Helix clinic (for probably the last time. It's getting a bit old, and the helix was dismantled three years ago now), attended a lot of clinics others gave, toured some local layouts, and of course attended the National Train Show. What a great time!
Once back home, I tried to get into the habit of working on the layout at least a few minutes every day, and was mostly successful. I just had to make myself do it, because with working ten hours and driving four hours four days a week, I had very little time in the evenings. Often I would only spend ten to 15 minutes on the layout, but those brief stints added up to a lot of yard tracks being laid over the course of a month.
On November 16th I held another work session. Being as we were getting on towards the holidays, that seemed like about the last weekend of the year that was viable. Only Jim and Phil were able to come over, but we got a lot done. We built the first benchwork sections for the Casper yard area, against the wall behind Laurel. The NP tracks will run against the wall there to the staging area in one of the smaller rooms. That determined the need to get those sections built. We also hung some of the sky backdrop I salvaged from my old NJ layout, just above the new benchwork. I didn't take any photos of that work session, but I have a shot showing the new benchwork below.
I'd initially designed Laurel to be a three track interchange yard, and one of the tracks would double as the lead to the engine facilities. But as I built the yard, I couldn't help noticing that there was ample room for two more yard tracks. Plus the more I thought about it, the more it seemed that so few yard tracks would be inadequate to support operations I've envisioned for this part of the layout. So... just before Thanksgiving, I decided to bite the bullet and add the two additional tracks.
My goal for the four day Thanksgiving weekend was to build the four #6 left-hand turnouts I needed for the yard tracks at the far end of Laurel Yard. Even with everything else going on that weekend, I managed to meet that goal, and even got a lot of the prep work for installation done!
So finally some photos again, which will bring us almost up to date. These were all taken 28 December 2013.
 Here you can see the "far end" yard throat for Laurel, with the two additional tracks on the right.
 Here's another view of the throat, from a different angle. The two nearest turnouts are #8's, and the four yard track turnouts are #6's. That's why the slight curve to the right beyond the second turnout - the angle on the #6's is a bit steeper than on the #8's.


In early May I was laying out the end of the Laurel yard throat at the turnback curve:


June 15th I had another work session.


After the work session I just kept slogging along building the turnouts and installing the yard from the one end to the other. I should probably have taken a few pictures as I went, but I didn't take any more of the layout until the end of 2013.
I took a week off from everything - the layout, work, and just life in general, to attend the NMRA national in Atlanta in July, along with my wife. I gave my Helix clinic (for probably the last time. It's getting a bit old, and the helix was dismantled three years ago now), attended a lot of clinics others gave, toured some local layouts, and of course attended the National Train Show. What a great time!
Once back home, I tried to get into the habit of working on the layout at least a few minutes every day, and was mostly successful. I just had to make myself do it, because with working ten hours and driving four hours four days a week, I had very little time in the evenings. Often I would only spend ten to 15 minutes on the layout, but those brief stints added up to a lot of yard tracks being laid over the course of a month.
On November 16th I held another work session. Being as we were getting on towards the holidays, that seemed like about the last weekend of the year that was viable. Only Jim and Phil were able to come over, but we got a lot done. We built the first benchwork sections for the Casper yard area, against the wall behind Laurel. The NP tracks will run against the wall there to the staging area in one of the smaller rooms. That determined the need to get those sections built. We also hung some of the sky backdrop I salvaged from my old NJ layout, just above the new benchwork. I didn't take any photos of that work session, but I have a shot showing the new benchwork below.
I'd initially designed Laurel to be a three track interchange yard, and one of the tracks would double as the lead to the engine facilities. But as I built the yard, I couldn't help noticing that there was ample room for two more yard tracks. Plus the more I thought about it, the more it seemed that so few yard tracks would be inadequate to support operations I've envisioned for this part of the layout. So... just before Thanksgiving, I decided to bite the bullet and add the two additional tracks.
My goal for the four day Thanksgiving weekend was to build the four #6 left-hand turnouts I needed for the yard tracks at the far end of Laurel Yard. Even with everything else going on that weekend, I managed to meet that goal, and even got a lot of the prep work for installation done!
So finally some photos again, which will bring us almost up to date. These were all taken 28 December 2013.


Here's one more shot of the newer end of Laurel, looking from the opposite direction of the previous photo. The two nearest tracks will be extended to the opposite yard throat and tied in there, with a lead going off to the engine servicing area.

And speaking of the engine servicing area, I've started on that area a little bit. In November I bought a 130' turntable (they were on sale for a really good price, so the club was buying one. I just added mine to their order and saved half on shipping costs!). I put together the floors from three of the Modern Roundhouse kits (giving me a 12-stall roundhouse), then positioned the turntable and roundhouse where I would have best access - adjacent to the yard drill track. Enlisting my wife's help, we managed to put down a single sheet of cork for the turntable and roundhouse complex. The level is approximately where one of the turntable leads will run. The other will parallel it. Once I've got both lead tracks drawn in, I'll be able to cut out the hole for the turntable and drop it in place (probably still a few months away, as I'm going to finish the Laurel yard tracks first).

This view looking down the aisle between Laurel and Casper shows the backdrop and benchwork we installed at the November work session. At the far end will be a removable section of benchwork connecting the two sides of the aisle. The main entrance to the layout will be there. The removable section will swing out of the way to allow access - up, down or sideways, I'm not sure yet.
I'm currently building the switches to connect the two additional yard tracks to the "near-end" yard throat, plus additional switches for engine servicing tracks. That's going to require at least and additional three right- and two left-hand #6 switches, and I may add additional tracks beyond that, as there is plenty of room behind the roundhouse for additional facilities or maybe a couple of industries. Laurel is going to be a busy place!
And now we're up to date!
Sunday, December 29, 2013
Six Months and no updates
Sorry about that. I have been making slow progress, but my hobby time is rather limited, so I try to spend it on the layout rather than on telling everyone what I've been doing. But I should have a pretty comprehensive updated posted in the next day or two.
Thursday, June 13, 2013
Work IS Progressing...
...there just aren't many photos of it.
I've been building turnouts, organizing the storage / work room, and preparing additional benchwork components for assembly / installation.
I've constructed two #8 Fasttracks code 83 turnouts for the entry into Laurel yard from the NP mainline. I have one more to build, then I'll need to construct several code 70 #6 turnouts. Laurel yard is getting more complicated as I go - I'll post an update to that part of the track plan soon.
I've been painting benchwork components for the ten days or so, in preparation for assembly and installation during this weekend's group work session (the first since April). That will provide space for the opposite end of Laurel yard, and take the NP track to the opposite end of the room from where the roundhouse is planned.
As mentioned, I'm having a work session this weekend (Saturday, 15 June), so I expect I'll have some photos to post early next week.
I've been building turnouts, organizing the storage / work room, and preparing additional benchwork components for assembly / installation.
I've constructed two #8 Fasttracks code 83 turnouts for the entry into Laurel yard from the NP mainline. I have one more to build, then I'll need to construct several code 70 #6 turnouts. Laurel yard is getting more complicated as I go - I'll post an update to that part of the track plan soon.
I've been painting benchwork components for the ten days or so, in preparation for assembly and installation during this weekend's group work session (the first since April). That will provide space for the opposite end of Laurel yard, and take the NP track to the opposite end of the room from where the roundhouse is planned.
As mentioned, I'm having a work session this weekend (Saturday, 15 June), so I expect I'll have some photos to post early next week.
Monday, April 29, 2013
Tracklaying Is Underway!
Progress continues on the new CB&Q in Wyoming, albeit a bit slowly.
A couple weeks ago I started laying track on the NP mainline on the side of the peninsula opposite the Laurel yard. The mainline track is code 83. The yard, when I get there, will be code 70. Not sure about the siding at Laurel yet, but I'm leaning towards 70 there as well.
About 15 feet of track is down, including some superelevated track around the end-of-peninsula curve that will skirt the roundhouse.
As you can see from the shot just below, lots more stuff I need it for construction is winding up on the table. I'm short on work table area, so it winds up on future ROW for now:

Here's a close-up of the loco on the curve, showing the superelevation in the loco's inwards tilt:

I've borrowed a set of Fast Tracks #8 turnout jigs from a friend, and will soon be building the mainline turnouts that will go into Laurel yard. The first of these is necessary before much more in the way of track can be laid.
A couple weeks ago I started laying track on the NP mainline on the side of the peninsula opposite the Laurel yard. The mainline track is code 83. The yard, when I get there, will be code 70. Not sure about the siding at Laurel yet, but I'm leaning towards 70 there as well.
About 15 feet of track is down, including some superelevated track around the end-of-peninsula curve that will skirt the roundhouse.
As you can see from the shot just below, lots more stuff I need it for construction is winding up on the table. I'm short on work table area, so it winds up on future ROW for now:

Here's a close-up of the loco on the curve, showing the superelevation in the loco's inwards tilt:

I've borrowed a set of Fast Tracks #8 turnout jigs from a friend, and will soon be building the mainline turnouts that will go into Laurel yard. The first of these is necessary before much more in the way of track can be laid.
Saturday, April 06, 2013
Plywood and Roadbed
Part of the Laurel tabletop for the yard and engine servicing facilities is down, and I've begun laying roadbed. As of April 3rd, it looked like this:
The framing square is in the future turntable / roundhouse area. The roadbed that's laid is for the big turnback curve at the end of the peninsula. The squiggly cork not yet installed is some stuff that was in boxes for our move. I don't know if it will ever flatten out, so I may never use it. What's laid is stuff I cut the previous day from the roll I bought years ago (the roll survived the move in pretty good shape).

This is just a close-up of the roadbed, showing how I simply pin it in place on curves until the glue dries. On tangent sections I just add little bit of weight to ensure that the cork doesn't pull upwards from the roadbed in spots before the glue dries:

Sorry for the marginal photo quality - Clearly I need to get my tripod out to take better photos under room lighting - the flash doesn't cut it very well.
The framing square is in the future turntable / roundhouse area. The roadbed that's laid is for the big turnback curve at the end of the peninsula. The squiggly cork not yet installed is some stuff that was in boxes for our move. I don't know if it will ever flatten out, so I may never use it. What's laid is stuff I cut the previous day from the roll I bought years ago (the roll survived the move in pretty good shape).

This is just a close-up of the roadbed, showing how I simply pin it in place on curves until the glue dries. On tangent sections I just add little bit of weight to ensure that the cork doesn't pull upwards from the roadbed in spots before the glue dries:

Sorry for the marginal photo quality - Clearly I need to get my tripod out to take better photos under room lighting - the flash doesn't cut it very well.
Sunday, March 24, 2013
Construction Begins!
I finally have a few photos!
Here's the room where the main part of the layout will be. As you can see, this is a pretty nicely finished room, which means I'll have to be very careful to protect the floor from finish-damaging debris, glue drip and what-not:

I had a work session yesterday (Saturday the 23rd). Five of my model railroading friends from Charleston spent two hours on the road (each way!) to come out and help get the construction ball rolling.
By the end of this first session, we had the Laurel benchwork framing complete and risers installed. We also laid in the first two sheets of plywood at the far end (the wide end) of the peninsula, but I took these photos before we did that.

This is just a shot sighting down the risers to see if the tops line up reasonably well. I think they do:

And here's my construction crew. Left to right is Allen, Phil, Jim, John and Jimmy. I hope I can convince them to come back again - in four hours we did what would otherwise have taken me weeks to accomplish! They all said they'd be back, but that's as they were all running for their cars before the two hour trip home!

Here's the room where the main part of the layout will be. As you can see, this is a pretty nicely finished room, which means I'll have to be very careful to protect the floor from finish-damaging debris, glue drip and what-not:

I had a work session yesterday (Saturday the 23rd). Five of my model railroading friends from Charleston spent two hours on the road (each way!) to come out and help get the construction ball rolling.
By the end of this first session, we had the Laurel benchwork framing complete and risers installed. We also laid in the first two sheets of plywood at the far end (the wide end) of the peninsula, but I took these photos before we did that.

This is just a shot sighting down the risers to see if the tops line up reasonably well. I think they do:

And here's my construction crew. Left to right is Allen, Phil, Jim, John and Jimmy. I hope I can convince them to come back again - in four hours we did what would otherwise have taken me weeks to accomplish! They all said they'd be back, but that's as they were all running for their cars before the two hour trip home!
Thanks, guys!

Friday, March 22, 2013
The basic layout arrangement has now been set (until I change it, anyway!). There have been changes to the NP trackage - I moved Laurel from against the wall over to a peninsula, to allow access to all sides of the 7'-wide tracks and engine terminal. Here's the basic plan:
 You can see the new position of Laurel on the NP. Other elements of the track plan are more of the "general arrangement" variety - only the NP is currently detailed.
I think I can fit Lander back into the plan. Initially I thought I would have to leave it out, which would reduce the layout to only one branch (the Cody line), but if I can work out the elevations properly, I'll have a much better operations scheme with both Cody and Lander branches.
I might even be able to fit Lusk (C&NW east staging) back in, positioning it over the turnback curves for NP staging. I'll have to mull that one over a bit...
I think I can fit Lander back into the plan. Initially I thought I would have to leave it out, which would reduce the layout to only one branch (the Cody line), but if I can work out the elevations properly, I'll have a much better operations scheme with both Cody and Lander branches.
I might even be able to fit Lusk (C&NW east staging) back in, positioning it over the turnback curves for NP staging. I'll have to mull that one over a bit...
Monday, February 18, 2013
NP Trackage
Here's a diagram of the new NP Laurel MT / CB&Q Scottsbluff NE interchange and staging (which generally refer to as the NP trackage):
 The grayish lines are a 12" grid. I've included some dimensions for this area of the layout to give a sense of size.
Minimum radius on the NP trackage is the same as it was on the NJ layout - 36 inches. The rest of the layout will be 30 inches on mainlines, with some industry trackage possibly a bit tighter.
At the top of the diagram, where the 3'-0" dimension is, is the doorway that leads into the layout. The dotted lines are the edges of the benchwork. I've adopted a 3'-0" minimum aisleway width for the entire layout.
The Laurel interchange yard is actually somewhat larger than the original I built in the NJ version of the layout - there are now three yard tracks rather than two, and the tracks are longer than they were. The engine servicing area will also sport a larger roundhouse than I had room for before.
Towards the bottom of the diagram you can see where the tracks penetrate the wall into another room at the bottom. This room will hold the Seattle and Minneapolis stanging yards, which have been combined into one six-track yard with a through track in the center. One side will be used for Minneapolis (or eastbound) and the other for Seattle (westbound).
Sometime in the next couple of weeks I'll post the basic arrangement for the Wyoming mianline and the Cody branch.
Thursday, February 14, 2013
A Status Update...
Layout planning is continuing. A workable general arrangement of benchwork and major layout features has been developed, and only (only!) detailed planning is left to be done.
This version of the layout will be simpler than the New Jersey version that was under construction, for a couple of reasons:
This version of the layout will be simpler than the New Jersey version that was under construction, for a couple of reasons:
- First, I want something I have a chance of completing to a major extent (all trackage, basic scenery, and detailed scenery in some places) within a decade or so. I want to have most of the main tracks operational and be able to start ops sessions within a couple of years.
- Second, while I have about the same square footage available as before, the configuration is different, and I have also to make allowances for access to areas around the layout that are not train related (storage closets, spare bedrooms, media room, etc.).
- Finally, and maybe most importantly, I don't just want to undertake a project of such megalithic proportions again - at least right now.
Tuesday, February 05, 2013
The Phoenix Begins To Rise!
FINALLY!
Work has just begun on the newest incarnation of the CB&Q in Wyoming! Just barely - the first section of benchwork has just been started. But the important thing is that it has started!
Track planning is probably about 20% complete and is ongoing, but one part of the layout has been firmed up enough to begin construction.
Photos and the in-progress track plan will be posted soon, so check back!
Friday, July 13, 2012
Standing Still - Almost
Well, time seems to be standing still in terms of layout rebuilding.
We purchased a home in Allendale SC a few months ago, and have been working to get it into shape. A "guest house" just off the main residence will be the new train room.
We knew there was a leak in the roof on one side, but planned to have that fixed.
Initially we used the guest house to store things (on the dry side of the place!) as we were setting up the house and getting the roof repaired. That all seemed to go as planned, and roof repairs were completed a couple weeks ago. We spent the last ten days or so clearing out the train room and at least started getting it ready for layout construction (a new layout plan is well under way) when a few days of heavy thundershowers cropped up. The roof leaks even worse than before!!!
So now I'm on hold until we get this figured out and good repairs made.
Stand by for more in the next couple of months!
Wednesday, September 21, 2011
It's been a bit over nine months since I posted that the layout was coming down.
It's completely gone (has been since around March). I was able to salvage most of the track and a great deal of the benchwork. Roadbed and subroadbed went into the trash. All the structures (the pitiful few there were) are packed away, and rolling stock is sitting in the rented house in Charleston.
I've joined the Charleston Area Model Railroad Club, and manage to exercise my equipment there on occasion.
I have no idea when I'll have a new house in which to put a layout - the bad market has ours in New Jersey not selling anytime soon, it looks like.
Friday, December 03, 2010
CB&Q in Wyoming is being Dismantled!
There have been three years of little to no activity on the layout due to my foray into local politics. My delving into New Jersey politics is fortunately coming to an end (talk about diving headfirst into basement of an outhouse!).
The remainder of the story is that I am being transferred by the company to South Carolina - permanently! All in all a good move (any way of getting out of New Jersey is a positive), but it means the CB&Q in Wyoming is now in the process of being dismantled.
I'm salvaging all the track I can, and of course all the rolling stock and such is being saved. Even as much as possible of the benchwork dimensional lumber is going to be retained for re-use.
I don't have a new home yet and probably won't for several months to come. As soon as I have the dimensions of a new layout space design will begin on the new CB&Q in Wyoming.
The remainder of the story is that I am being transferred by the company to South Carolina - permanently! All in all a good move (any way of getting out of New Jersey is a positive), but it means the CB&Q in Wyoming is now in the process of being dismantled.
I'm salvaging all the track I can, and of course all the rolling stock and such is being saved. Even as much as possible of the benchwork dimensional lumber is going to be retained for re-use.
I don't have a new home yet and probably won't for several months to come. As soon as I have the dimensions of a new layout space design will begin on the new CB&Q in Wyoming.
Thursday, January 29, 2009
Work progresses, albeit still slowly.
Here's a more-or-less overall view of the layout as of the end of December:

The blank part of the skyboard to the far left has been painted now. We started adding a ceiling to the room to control the dust and debris that falls onto the layout from above. The corner in the left distance is where we began. It's slowly expanding towards the camera and to the right. Before more benchwork is installed the ceiling will be put up above those areas. It will probably be a long time before the entire ceiling is finished, but it will be done a bit at a time until it's complete.
Here's another shot of recent work - the studs and mounting frames are in place for the backdrop all the way around to Casper now. The far corner in this shot is where I stood to take the previous shot. Ceiling will be done in these areas before benchwork goes up.


Tuesday, December 23, 2008
It's been five months since I posted. There's a good reason - I've had very little time or energy to work on the layout.
I've managed to put in fifteen or twenty hours since the last post, though, so I thought I'd go ahead and tell you what's been done.
I've continued the backdrop installation and painting. Here's a photo of the painted backdrop before I installed any scenery:

I also did some cheap-and-dirty scenery for some shots for my helix presentation, which I gave at the Mid-Eastern Region convention in Reston in late October. Here's an overall shot:

While the landforms are the final ones (except for cutouts for access to tracks behind the hill), the yellowish scenery and trees aren't - they were just for the presentation. There will be no trees in this area and the ground will be a somewhat darker tan/brown with sparse prarie grass and sagebrush sprinkled around.
I've continued adding to the backdrop, and the skyboard now continues uninterrupted past Thermopolis. The hill profiles only extend to the curve in the backdrop at the corner right now. I'm going to try to continue on with them during the Christmas break.
Subscribe to:
Posts (Atom)