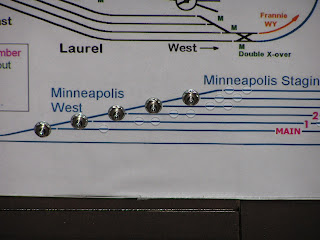
The new control panel is coming along slowly, but it IS progressing. I managed to get one bank of track selected indicators wired, and all the Tortoise switch wiring is complete. Here's a couple of shots of the panel as of Sunday night:
And here's a view of the face of the panel with one occupancy indicator temporarily powered:
Welcome to the Construction Blog for The CB&Q in Wyoming! Here I'll update, on a more frequent basis than on my website (http://www.thecbandqinwyoming.com) construction of my layout.
About Me
- Mark B.
- Allendale, SC
- I grew up in Wyoming, mostly living in areas served by the railroads I model. I remember standing at the window in our Cody Wyoming home, staring at night at the old Husky refinery across town. I remember the bridge across the creek and under the tracks between Powell and Cody. I remember always looking for trains as we travelled through the Wind River Canyon. And I remember my mother's last home - a mobile home in Evansville next to the Burlington mainline.
Tuesday, July 31, 2007
Monday, July 23, 2007
Well, I decided to forgo the panel mounts for the LEDs. I'll secure them in place with a dab of rubber cement or something on the bottom lip.
Here's the new panel graphic:
I finished cutting and drilling the panel's plastic sheets, and installed the switches. A closeup of one section looks like this:
The holes which are NOT punched in the graphic yet are for the LEDs. Each track except the main gets two LEDS near the switches - a blue one to give an at-a-glance indication of which route is selected, and a bi-color (red/green) one to indicate whether that section is occupied (red) or clear (green). The main will not store trains, so it doesn't have occupancy detectors.
Wiring is just barely started:
I plan to work on this each night for the next week or two until it's done.
Wednesday, July 18, 2007
I guess I need to plan ahead a little better.
I ordered the LED panel mounts yesterday morning, then at home tonight I worked on the panel. I got all the switch holes drilled and the switches temporarily installed. Getting the panel mounts for the LEDs installed would be challenging, because the smallest require a 1/4" mounting hole, and is about 3/8" diameter over the bezel. So - a choice.
Do I redesign the panel graphics once again, leaving more distance between the yard track lines and then buying new plastic and starting over again, or do I forego the panel mounts, and install the LEDs directly in the panel (using rubber cement or something else that will allow me to remove the LEDs if I damage one)?
I chose the latter - we'll see how that works. So a whole batch of panel mounts I don't think I'll need will show up in a few days. Oh, well.
No work on the layout tonight, and probably not tomorrow, either - I'm attending an operating session on a nearby layout tonight, and I have a political meeting tomorrow evening.
Tuesday, July 17, 2007
Well, I did NO work on the layout last night. My back is still bothering me, so I'm not sleeping real well. After a full day of work, an hour spent stripping paint on a window and a few minutes installing a piece of baseboard, I was absolutely pooped! I plopped down in front of the TV at 8:30 and promptly dozed off. I slept pretty well last night (in a recliner - easier on the back), so I hope to get some work on the control panel done tonight.
Yesterday I did order some panel mountings for the LEDs - something I forgot to do when I ordered the switches a few weeks ago. Hmph! Here's a schematic of the wiring for one end of the Seattle staging yard (the other end will require an identical arrangement):
Two more middle switches and LEDs, wired the same as this middle switch and LED, will be needed for each end of the Minneapolis yard. Note that the LEDs indicate which track is SELECTED, and not the actual position of the turnouts. That's all I wanted - an indication of what track off the yard ladder I've selected.
Not shown here, since they're separate circuits, are the IRDOT LEDs and wiring.
Depending on how much time I have after paint stripping tonight, I may actually start wiring the switches.
Monday, July 16, 2007
I got the second sheet of the Glenrock backdrop mounted a couple of days ago. I just need to get some plastic putty to fill the gap, then about fourteen feet of the backdrop will be ready to paint!
Last night I cut the new plastic face of the panel to size and sandwiched the graphic in between two sheets of the stuff. I slipped the sandwich into the grooves on the panel frame and began drilling it for the new switches. I got about ten switches in, leaving ten to go. I'll finish drilling those switch locations tonight or tomorrow.
I realized that I forgot one very inportant thing - panel mountings for the LEDs. I'll need about 36 of those. I guess I'll order a batch from Digikey.
Monday, July 09, 2007
Well, the new switches for my control panel came in Friday. Bad news - the case is so much larger that I'll have to basically rebuild the panel from scratch! The switches won't fit where the others are now. That will be a chunk of work! I bought new lexan for the panel face, and re-worked my graphic for the new switch spacing. I went to print it out and discovered I don't have any 11X17 paper! Maybe I'll get it printed by tomorrow... then I can start populating it (again).
Thursday, July 05, 2007
Monday, July 02, 2007
I started preparing to install the backdrop behind Glenrock, and did some "fit checks" of the second deck benchwork over that area. The second deck looks like it will work well. There's plenty of room between the tracks on the lower deck and the bottom of the fascia board on the second deck.
I'm using white styrene for the backdrop, and mounting it with 1X2s. I got the 1X2s installed for Glenrock, and half-installed a curved piece of plywood that will carry the backdrop over to the helix.
Subscribe to:
Posts (Atom)